Showing posts with label beauty treatments. Show all posts

Tuesday, July 1, 2014

4 Surprising Makeup Tricks You Need to Try

Our Makeup Expert shares the best beauty tips she's learned from clients, family and friends.


I am always open to learning something new…and I love that there never seems to be any rhyme or reason to my lessons or who they come from. In the “school” of makeup artistry, my teachers are everywhere!

Here are some of the favorite products and tricks that I learned from clients and friends along the way—hope you enjoy them. And feel free post your favorite makeup tricks and tips below in the comments!
Courtesy of Make Up For Ever

Make Up For Ever HD Primer in Apricot
Ape for Apricot
Years ago, while working at a Givenchy show, I met a model who had, to put it nicely, very problematic skin. I can relate as I have the same issues. Before I went to work on perfecting her skin with my usual suspects, she pulled out a product she swore by. (Man, I love when models pack their faves!). The Make Up For Ever HD Primer in Apricot isn’t a shade I would normally lean on for color correcting all the redness she needed muted on her inflamed skin. But it subtly lessened the ruddy tones on her face so that I only needed to touch up a few areas. It’s a quick-dry formula that isn’t too powdery-feeling like some silicone primers, which sit atop the skin and amplify dryness around pimples. Thank goodness for this model citizen!
Courtesy of Maybelline
 

Maybelline SuperStay 24 in Continuous Coral
Grammy’s Go-To Coral
It’s true. Distinguished ladies love their coral—and my Gram wears it daily. Coral is the perfect shade of orange-y red that brightens up skin of any age. My Gram knows that a lot of the products out there in this shade creep into fine lines and wear off quickly. She loves the Maybelline SuperStay 24 in Continuous Coral. So much so, that in all her 90 years of testing different coral-colored products, she’ll tell you this one’s her favorite. I arrived to a package on my doorstep a year ago with three of these babies for my kit, and I totally agree with her. Gotta love Gram!
Courtesy of Colorscience

mineral powder concealer by Colorescience
The Greatest Cover Up
One of my favorite friends and clients, Stephanie Beatriz of Brooklyn 99 fame, is not only a comic genius, but she’s completely adorable inside and out. One day, as we were glamming her up for a press event, she busted out this amazing mineral powder concealer by Colorescience. I can’t believe I’m admitting this, but in my decade-plus of working in this industry, I hadn’t ever used a powder concealer product so I was skeptical. “Trust,” she said. Sure enough, I layered the correcting shades over a pimple with impeccable timing and it disappeared, taking its shine along with it. I was truly amazed and still am. I use this bad boy frequently now. Thanks, Steph!
Courtesy of Mally Beauty

Eyelash glue
It's Good to Be the Queen
You can learn the best tips from drag queens. Nobody, and I mean nobody knows how to make eyes look lifted, young and open like they do. I’ve always been addicted to these little eye stickies, which tuck heavy lids ever so slightly to help your eyes turn back time. As I was setting up my makeup table for a six-day commercial shoot, a guy in production who moonlit in drag on weekends walked over to me and said, “Honey, you know you can just use lash glue, right?” Intrigued, I had him show me. Sure enough, you run a trace of lash glue just below or above your droopy spot, open the eyes wide to tack the skin together and bam—eyelift, sans sticker.

I encourage you to pick up your own tricks from your friends, clients and family members. And don’t forget to post your faves here!

Call and schedule your massage today!  831.373.2273 or book on line at www.montereydayspa.com


Purchase products from our online store HERE   
Like our Facebook page HERE 
Follow us on Twitter HERE

Visit our website HERE
View our pins on Pinterest HERE

Wednesday, April 23, 2014

6 Spring Makeup Rules to Break

This season’s prettiest makeup is about changing the game, beautifully.

Spring Makeup Rules to Break

Old rule: Go bright or go home
New school: Embrace your dark(er) side

Spring lip color usually means punchy shades like coral, bright pink and 2014's standout star, tangerine. But a deeper hue can look gorgeous when the temperature starts to rise. Case in point: Nicole Miller’s Spring 2014 show, where models sported a beautiful berry lip, and Helmut Lang, where a crimson mouth was the order of the day. “Poppy or fuchsia shades work well on bronzed skin, but if you want to break the rules, go in the opposite direction,” says New York City makeup artist Carmindy. “Keep your skin protected with sunscreen and go for a deeper lip.” Try crimson or berry if you have fair to medium skin, and garnet, chocolate or merlot if you have darker skin. “Just make sure to choose a formula that’s sheer and moisturizing,” Carmindy says. “Dry, opaque formulas can look too severe.”

Try:
Aveda Nourish-Mint Sheer Mineral Lip Color in Sheer Muscadine
($16) a hydrating formula with plant and fruit waxes to help soften lip lines, in a beautiful sheer red-wine hue.
Laura Geller Love Me Dew Moisturizing Lip Crayon in Plum Freeze ($16). This supersize pencil feels like a balm but gives lips a nice color payoff, with Vitamin E for moisture and a just-glossy-enough plum tint.

Embrace your dark(er) side
Old rule: Go easy on the eyes
New school: Smoke it up
When models walk the spring runways, their lids and lashes usually lean more towards understated than in-your-face. But at Jill Stuart’s Spring 2014 show, makeup artist Aaron de Mey broke the rules beautifully, creating a smoky eye inspired by “rock stars’ girlfriends.” His one concession to spring: A hint of shimmery silver shadow on the inner corner. Get the look by lining your top and bottom lids (including the waterline) with black pencil, smudging charcoal shadow on your lids, then dusting silver shadow on your inner corners. Finish up by coating your top lashes with black mascara. (Rock star boyfriend entirely optional.)

Try:
L’Oréal Paris Silkissime Eyeliner by Infallible in Black
($9), a tug-free pencil that lives up to its “designed to glide on like silk” marketing hype. And because it’s a long-wear formula, it’s a good choice for lining the easy-to-smear waterline area.
L’Oréal Paris Infallible Eye Shadow in Silver Sky ($8). Dust a smidge of this silver shadow in your inner corners to lighten up a smoky eye. Perfect for spring.
Sephora Collection Outrageous Volume Mascara in Black ($15). The last step to any smoky eye: black mascara. This formula has hyaluronic acid to help keep lashes conditioned.

Spring Makeup Rules to Break
Old rule: Switch to pastels
New school:
Join the navy
A shimmery cream shadow in a deep navy blue looks fresh and unexpected for spring. Think ocean-at-night rather than Easter egg. “Prep your lids with a little powder before applying your cream shadow, and apply it on the lid and under your lower lashline only,” says Carmindy. “Not in the crease, which can get messy.” Then blend a powder shadow in an ever-so-slightly lighter shade of blue into the crease, and apply highlighter under your brows and in your inner corners.

Try:
Shiseido Shimmering Cream Eye Color in Nightfall ($25), a beautiful deep blue that’s easy to smudge on with a fingertip or shadow brush.
Flower Eyes on the Prize Eyeshadow Chubby in Dark Side of the Blue ($8), a paraben-free formula in a no-sharpening-required jumbo pencil. For a sheer application, swirl your fingertip over the pencil and lightly pat on lids.
Carmindy & Co. Carmindizing Highlighter Duo in Ethereal ($27). One half is a cream highlighter and the other half is a powder. We like applying the cream to the browbone and the powder to the inner corners.

Join the navy
Old rule: Step away from the foundation
New school: Be an ace of base

Used to be makeup artists recommended ditching foundation during the spring and summer months and trading down to a tinted moisturizer. But now, there’s a host of new high-coverage formulas that look and feel super light and breathable. So if you prefer the coverage of foundation, there’s no need to switch over to formulas with less oomph when the weather warms up. Apply with your fingers for the most coverage, or try Carmindy’s trick: “Prep a sponge with primer or moisturizer and use that to blend on your foundation,” she says.

Try:
Becca Ultimate Coverage Complexion Cream ($44). This full-coverage formula is highly concentrated, so you need a much smaller amount than you would with a traditional foundation. We love that it comes in a range of shades for every skintone, from super-light porcelain to deep cocoa.
Eve Lom Natural Radiance Mineral Powder Foundation ($50). If you prefer a powder finish, the cult U.K. skincare brand introduces a weightless mineral foundation with light-reflecting amethyst, ruby and rose quartz particles to illuminate the skin and blur imperfections.

Be an ace of base
Old rule: Say hello to shimmer
New school: Meet matte

Spring blushes and bronzers usually have more sparkle than a Broadway show, but a few new spring offerings prove just how fresh and pretty a matte cheek can be. “Some areas of the face need a glow, but it doesn’t always have to be your blush or bronzer,” says Carmindy. “It’s soft and romantic to do a matte cheek, and not as typical.” Bonus: If you struggle with large pores or oily skin, a non-shimmery cheek can work wonders. The matte finish downplays pores and helps keep oil in check.

Try:
Nars Matte Mulitple in Cappadoce ($39). This matte, golden bronze works on a range of skintones. Apply it straight from the tube for more impact, or dampen your fingertips and dab on for a sheerer effect.
Palladio Herbal Matte Blush in Berry Pink ($7). This pretty pink is on the cool side, so it pairs perfectly with a berry lip. Kaolin clay and zinc oxide give a fresh matte finish, while chamomile extract adds an antioxidant boost.

Meet matte
The old rule: Neutrals on nails, brights on toes
The new school: Play the blues
Sure, ballet pink nails and cherry red toenails look gorgeous—we’re not saying they don’t. But why not break the rules and try something a little more attention-getting this spring? “I think it’s great not to follow the typical script of using light colors on nails and darker colors on toes,” says New York City manicurist Jin Soon Choi. “Try a darker shade on your fingernails and a light color on your toes, just to have fun and mix things up a bit.” Color wise, she suggests breaking the typical spring mold and trying cool hues like white, blue or metallic turquoise. Different? Yep. Gorgeous? Absolutely.

Try:
Jin Soon Kookie White
($18). Trade your usual sheer pink for this super-chic white with hints of blue and gray. It’s 5-free (not just 3-free), so your nails will thank you.
Butter London in Airy Fairy ($15), a medium, metallic turquoise that complements every skin tone, from fair to dark.

Play the blues
Book your appointment online now at www.montereydayspa.com!
Purchase products from our online store HERE 
 
Like our Facebook page HERE 
Follow us on Twitter HERE
Visit our website HERE
View our pins on Pinterest HERE

article source: youbeauty.com

Monday, April 21, 2014

Skin care: 5 easy ways to keep pimples at bay

Acne is amongst the most common skin problems that people of all age groups, especially teenagers face. There can be many reasons that attribute to the cause of acne like stress, puberty, hormonal changes, menopause etc.
 

Here are a few acne defense tips and reminders:
-Wash your face properly. It is recommended to clean your face twice a day and not more than that as it can leave your skin more oily.

-Always remember to wear sunblock as the sun has UVA and UVB rays which initially may worsen those pimples.

-Don't use make-up all the time or if required switch to water based make-up.

-Caffeinated drinks like coffee and tea are a strict no-no as they harm the skin a lot and further aggravate acne problem.

-Avoid using soaps as they damage skin by making it drier, rougher and more permeable to bacteria.

And of course we recommend regular facials by one of our estheticians.  Call today to schedule an appointment - 831-373-2273


Book your appointment online now at www.montereydayspa.com!
Purchase products from our online store HERE 
 
Like our Facebook page HERE 
Follow us on Twitter HERE
Visit our website HERE
View our pins on Pinterest HERE

Monday, January 20, 2014

DIY Don't: 2 Beauty Products You Should Never Make Yourself

When it comes to mixing up your own creams, scrubs and cleansers, there are a few that—for your skin's sake—should be left to the professionals.


DIY Donts: 2 Beauty Products You Should Never Make Yourself
The DIY movement is amazing for many reasons. Making something with your own hands feels good and gives you an appreciation for the craftsmanship involved in making other products. In the best cases, when you create a genius product that all your friends want (we’ve mixed up a few great DIY skin recipes here) it’s a path to financial freedom.

But in the worst cases, it’s a path to cystic acne. There are a couple of misguided (though well-meaning) DIY tips being shared on social media sites that, for the sake of our skin, should not follow us into 2014, and here they are:

1. Do Not Make Your Own Cleansing OilI had a very enlightening conversation with a dermatologist friend who brought this topic to my attention. She was mortified by the number of patients with deep cystic acne from using DIY Cleansing Oils. Even people with no history of acne have experienced eruptions from this DIY project. I admit that there are many DIYers who swear by homemade cleansing oils and are probably up in arms right now, but this is not a method that works for everyone.

DIY cleansing oils don’t clean the skin: Nine out of 10 commercial cleansing oils contain surfactants to help whisk the dirt away during rinsing. DIY cleansing oils don’t. From the chemical perspective, this keeps the oil from cleaning pore-clogging debris off the skin. Here’s why: A surfactant has an oil-loving tail connected to a water-loving head (hydrophilic). The tails of the surfactants are instantly attracted to dirt, dead skin and sebum, surrounding it and creating a “micelle” (picture a beach ball with peach fuzz). The tails form a circle around the dirt, dead skin and sebum, leaving the water-loving heads on the outside. Being true to their hydrophilic nature, the heads connect with the water during rinsing (that’s when the cleansing oil turns white) and are swept away down the drain dragging the tails and pore-clogging materials along with them.

DIY cleansing oils cannot simply be rinsed away: As most of us learned in elementary school, oil and water don’t mix. Wiping your face with a warm towel is more effective than rinsing alone, but only the surface oil is being removed—nothing is binding with the dirt and debris in the pores to get them clean. The proper method involves placing a very hot towel on the face until it cools down, gently wiping the face with the towel, and then repeating (several times if necessary). Though many people can tolerate this treatment, there are many with problem skin that cannot.  Do yourself a favor and consult with your dermatologist before delving into this DIY trend.

2. Do Not Make Your Own Sunscreen This is a big no-no! There is more to creating a natural sunscreen than simply mixing zinc oxide and/or titanium dioxide with oil. What’s wrong with this method? Let me break it down for you.

Zinc oxide and titanium dioxide are particles that stick together: The only way to break them apart is to use very high shear mixing (sorry, your blender won’t cut it). This makes the sizes uniform and helps with an even application, which is very important for these sunscreens since they work by scattering the UV rays. We are dealing with microscopic sizes so merely looking at it (even with a magnifying glass) or rubbing it on your skin to check for evenness is not going to tell you if you have small, uniform particles. When you mix these without the high shear, you are leaving gaps for the UV rays to get through and have access to your skin.

Necessary suspension: Another key element in creating effective zinc oxide and titanium dioxide based sunscreens are using oils that help the particles stay uniform. Some ingredients are compatible with the sunscreens and help the particles stay apart, while some are not and actually force the particles together. Yes, some natural oils have been tested in-vitro (with a machine, not on human skin) and have calculated SPF values but:
  1. The SPF of materials change when mixed with other ingredients.
  2. The final SPF does not add up to the sum of its parts, meaning an oil with an SPF of 4 mixed with a sunscreen with an SPF of 16 does not make the final SPF 20.
  3. How the sunscreen is made influences the SPF just as much as the ingredients.
Now that it’s on your skin, who says that it’s going to stay there? Not only is it important for the particles to stay separated before applying the sunscreen, it’s just as important for them to stay put once you apply them. Without a proper film former, the particles will move around, leaving your skin vulnerable. A thick product does not mean that it will stay put—heat melts waxes so they are not the best ingredients to rely on for keeping the sunscreen in place.

I can appreciate a desire to use nothing but the purest ingredients straight from nature to create a sunscreen, but unfortunately, certain ingredients are necessary to make an effective sunscreen that feels good enough for people to want to use it.
Book your appointment online now at www.montereydayspa.com!

Purchase products from our online store HERE 


Like our Facebook page HERE 
Follow us on Twitter HERE
Visit our website HERE
View our pins on Pinterest HERE

Article source: youbeauty.com 

Wednesday, January 15, 2014

10 Easy & DIY Methods to Tame Frizzy Hair


Simple, Effective Ways to Control Frizz


Few things are more frustrating than watching your coiffed hair gradually blur out into a frizzy, poofy mess. Frizz can be brought on by damage caused by heat or protein-stripping products, the natural texture of your hair, and our personal favorite and equal opportunity frizz-producer: humidity. In the continued war against frizzy, unruly hair, we’ve put together a list of the best simple and DIY methods worth trying before the next humid day gets the best of your locks and looks.


Avoid Alcohol You can still have your cocktail, but as far as your hair goes, keep it sober. Products that contain alcohol tend to dry out your hair leading to breakage, a lackluster appearance and yes, frizz. So check your hair product labels and chuck ones with alcohol.


Use Products with Polymers & Silicone
Tons of hair products promise to tame frizz, but focus on looking for conditioners, leave-in treatments, styling products, etc. that say they contain polymers or silicone on the label (often listed in the forms of PVP Copolymer and dimethicone, respectively, on the label).

Polymers and silicone coat your hair to help keep your style in place and also act as barriers between your hair strands and the outside moisture that causes frizzy, poofy, unkempt hair. While they aren’t perfect, polymers and silicone will help to reduce frizz caused by humidity.


Condition the Ends 
Make sure that the ends of your hair (the driest and frizziest part of your mane) get conditioned well to help them lay smooth rather than pop out.

When you’re in the shower, apply your conditioner starting at the ends of your hair and then work the product up toward your scalp. Or, you can instead use a leave-in conditioner for an added barrier—after showering, apply the conditioner starting at the ends and working your way up.


Cool Wash
Frizz happens when the cuticle of your hair is open or raised. The flatter the cuticle lays, the healthier and shinier your hair looks. One way you can keep the cuticle flat is to blast your hair with cold water right after you condition, just before you get out of the shower.


T-Shirt Dry
It’s best to let your hair air-dry—the heat from blow-drying damages your hair, causing it to get even frizzier.

But don’t be tempted to reach for a towel to speed up the air-drying process: Too much friction can aggravate the cuticle of the hair, ruining that cold wash you just endured for frizz-free, shiny hair.

Instead of using a thick, rough towel, dry hair with a clean, soft t-shirt by twisting the hair within the shirt. Do not rub up and down at the scalp or the ends as this can damage the cuticle and lead to even more frizz.

If you’re air-drying your hair over night, you can also wrap your hair in the t-shirt while you sleep.


Tie-It Back
If your hair gets poofy after you’ve just blow-dried it, loosely tie it back in a low bun and let it out when you get to your destination or right before you leave your home. This will help smooth out and tame down frizz. And pulling your hair back low and loosely won’t indent it like a ponytail will.


Avoid Brushing
If your hair tends to be frizzy, the best thing you can do is to not brush it. Brushing dry hair can stretch out the hair cuticle, while brushing wet hair can damage the hair shaft leading to hair loss. It’s best to just gently comb your fingers through your hair or use a wide-tooth comb to distribute conditioner if you need to.


Skip Shampoos
Washing your hair everyday can strip your hair of the natural oils it needs to maintain a healthy, frizz-free appearance. Instead, rinse hair with water, rub your scalp and roots to stimulate the area (this will help prevent it from clogging with oils), and apply conditioner (starting at the ends), then rinse.

Or, skip the water entirely and use a dry shampoo at the roots to give your hair body and soak up unwanted oil.


Re-Condition
Frizz often shows first at the ends of your hair, leaving hair looking dry and unhealthy, even when it’s not. So mix up a little re-conditioner to keep it in-check. (Note: These tricks are also great for controlling those pesky fly-aways.)

In your palm, squeeze a dime size amount of conditioner and add water until it is a thin consistency. Apply the mix to the ends of your dry hair (make sure to be really careful if you're applying it near your scalp, as you don’t want your hair to look oily or unwashed!). This should not make your hair soaking wet, but just wet enough to help the ends lay down. Now let your hair dry fully.

Another option: simply apply some coconut oil to your dry hair. Dab just a small bit on your fingers, and run it into your hair, applying first to the tips and then working your way midway up (go easy near your scalp—you don’t want to look oily, plus coconut oil can be pore clogging and cause breakouts in some).


Deep Condition: Avocado + Olive Oil Hair Mask
Frizzy hair tends to need more moisture than regular hair, so a weekly moisturizing mask can be exceptionally beneficial. There are several hair masks you can apply to frizzy hair, but this one with avocado and olive oil is particularly helpful. Avocado and olive oil add moisture to help smooth frizziness, and olive oil also helps act as an emollient to keep your hair moisturized.

Directions: 
Mash up one avocado and mix in a splash of olive oil. Shampoo your hair first, then apply the mask, starting at the tips of your hair and working it generously up to your scalp. Slip on a shower cap and let your hair absorb all the nutrients for 30 minutes to an hour. Afterwards, rinse and condition as normal.

 Book your appointment online now at www.montereydayspa.com!

Purchase products from our online store HERE 

Like our Facebook page HERE 
Follow us on Twitter HERE

Visit our website HERE
View our pins on Pinterest HERE


Article source: chixrx.com

Wednesday, November 6, 2013

6 Ways to Treat Red Bumps & Ingrown Hairs from Shaving or Waxing

How to Treat Razor Bumps & Skin Irritation


Those red bumps, irritation and ingrown hairs all caused by shaving or waxing
are the last thing you want to see…let alone in your nether regions. Questions
about how to get rid of those unsightly, embarrassing bumps are among the most
frequently asked on ChickRx. So we’ve compiled six effective strategies you can use
to treat those rash-like red bumps next time your skin decides to go haywire after a
wax or shave.


First: A Word On Preventing Red Bumps
Of course, the key to not having to deal with ingrown hairs and skin irritation is to
prevent them altogether. So before your next shave or wax, follow these important
steps:
  • Make sure you are never waxing or shaving skin that is already irritated. If your skin is particularly inflamed or broken out with bumps, waxing or shaving will further irritate the area and could even lead to serious skin infections or scarring.
  • Exfoliate the area before you wax or shave.
  • Before you shave (assuming your skin is not irritated), make sure you soak in warm water or let your skin absorb the hot steam from the shower for at least three minutes. 
  • Apply a protective shave gel rather than a cream as creams can clog your pores.
  • Make sure you’re using a clean, sharp razor (a new one if it’s disposable), shave in the direction of the hair growth, and do not pull the skin tight to try to get a closer shave (yep, this can cause ingrown hairs).

Manual Exfoliation 
If you do get red razor bumps, though, let’s talk about how to treat them. Those
bumps are caused by ingrown hairs—hair that curls back on itself and grows into
the skin, causing inflammation and redness. Sometimes these ingrown hairs/bumps
also get infected, causing folliculitis.

“The best way to treat [ingrown hairs] is to exfoliate well and consistently,” explains
dermatologist Dr. Debra Jaliman. The goal with exfoliating is to loosen skin
cells and impactions so the hair will be released from the blocked hair follicle.
Dr. Jaliman recommends using a sonic cleansing system like the Clarisonic, or the
versions made by Neutrogena and Olay. If you’re not already using one of these
skincare tools for your face and don’t want to invest, you can always use a loofah
instead.

Just make sure that if you use a loofah, you switch it out regularly to avoid
contaminating your fresh, clean skin with bacteria. 


Chemical Exfoliation 
If manual exfoliation alone isn’t cutting it for treating your bumps, licensed
esthetician Daniela Ferri recommends trying a chemical exfoliant.
The best way to do this is by using an acne wash that contains salicylic acid or
benzoyl peroxide. Gently massage it onto the affected skin with exfoliating spa
gloves, rinse with warm water and pat drying, being careful not to tug or rub too
much on the skin—this will only cause more skin damage and inflammation.

Salicylic acid and benzoyl peroxide have anti-inflammatory properties that can help
treat redness and irritation, but Ferri warns that for some they can be too over-drying.
After exfoliating either chemically or manually, you can apply products to further
treat and soothe your irritated skin.


Aspirin Mask
To help reduce redness and inflammation, you can apply an aspirin mask to the area
with razor burn. Dissolve two aspirin pills in a few drops of water until you achieve
a paste-like consistency. Apply this to the affected area for a few minutes and then
rinse off completely.


All-Natural Options: Tea Tree Oil & Aloe Vera
You can also take an all-natural, organic approach to soothe razor burn or irritated
skin. Try applying either tea tree oil or aloe vera to the skin using a clean cotton ball.
These naturally soothing products will help to calm the skin and reduce redness and
sensitivity, and you don’t have to worry about any added chemicals or ingredients
that might be irritating for sensitive skin.


Over-the-Counter Products
If you tend to get more severe outbreaks of bumps, you can apply products like
Tendskin or FerroRosa FrictionFixTM, which ChickRx experts recommend. These
products work by reducing inflammation and itching while reducing refraction, and
absorbing moisture and oil that can lead to further breakouts.

If you can’t easily get these products, you can also try a topical corticosteroid cream
(hydrocortisone cream), which helps reduce inflammation and pain.
If you still do not see improvement, visit your doctor who can prescribe antibiotic
creams to remedy the situation.


No Picking, Itching or Friction
Although ingrown hairs and irritation may induce you into a fit of itching and
scratching, try not to. This will only irritate the area further and slow your skin’s
healing process. And under no circumstances, should you pick at any bumps that are
inflamed—you know better.

For the underarms, avoid wearing constructing tops to prevent fabric from rubbing
on the skin, as this can hinder the healing process and also cause more bumps to
form. Pass on wearing rough pant materials (like jeans) for a few days if you’re
dealing with a bout of sensitivity on your legs or bikini area and stick to wearing
only cotton underwear (other types of underwear fabric—and g-strings—can cause
friction against your skin and prevent proper healing).

And don’t forget to shower right after your workouts. This will not only help treat
bumps from shaving, but prevent blemishes from forming on your back as well.

To schedule an appointment, give us a call at 831-373-2273.  You can also book online at www.montereydayspa.com

Like our Facebook page HERE 
Follow us on Twitter HERE

Visit our website HERE
View our pins on Pinterest HERE

Article source: chixrx.com

Monday, October 28, 2013

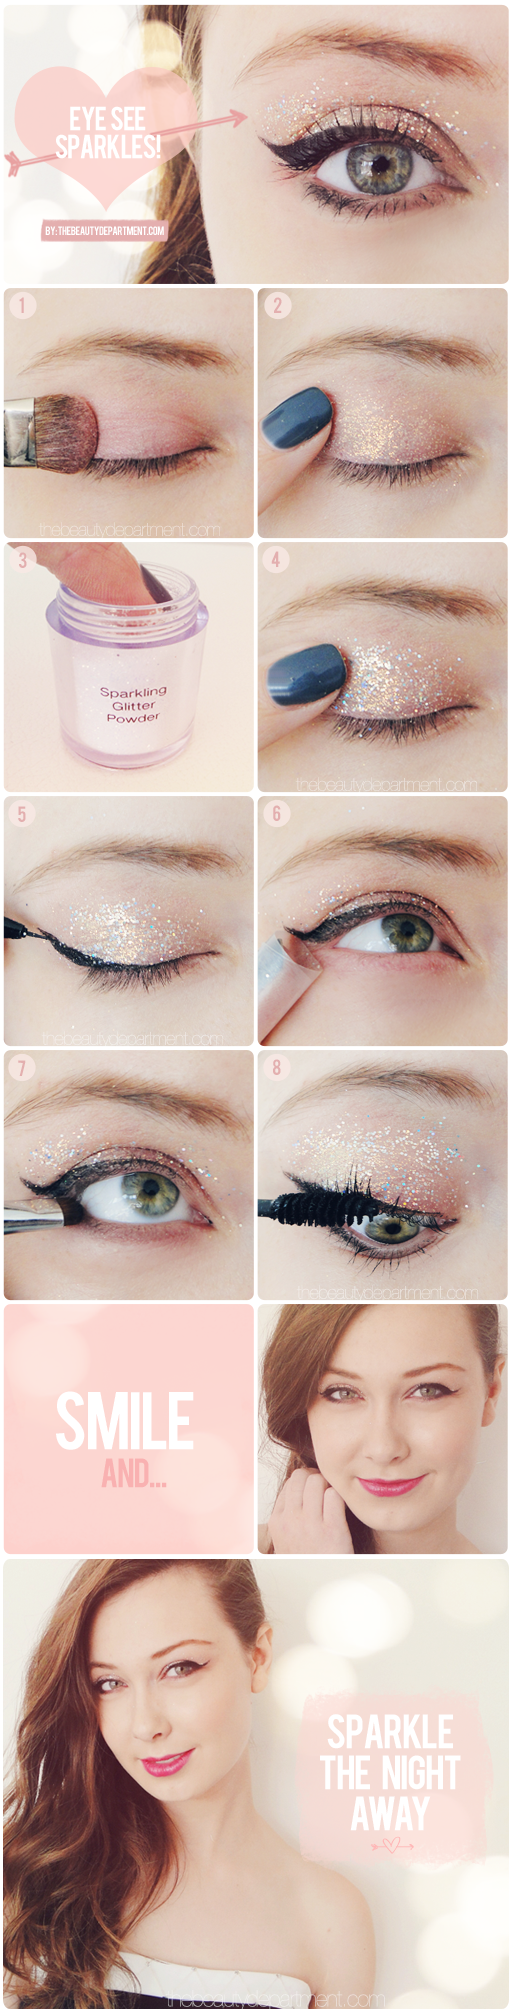
Bedazzle Me

A fun shimmery eye tutorial!  
POST + PHOTOGRAPHY BY AMY NADINE, GRAPHIC DESIGN BY EUNICE CHUN


I love this look for Homecoming, New Year’s or any time you’re feeling really festive! And because the glitter is light and paired with a light shadow instead of a dark smoky eye, it’s more wearable than you might think. Just know that it’s compliment-intensive so be prepared to say “oh thank you” a lot! Here’s exactly what I did on singer-songwriter Lexie Hofer above:

TOOLS:
  • A Pale Pink Shadow — Lexi’s wearing Jane Iredale Pure Pressed Eye Shadow in Pink Smoke.
  • A 2-Dimensional Glitter — I used NYX Sparkling Glitter Powder in Snow (they’re becoming hard to find unfortunately but MAC Glitter in Reflects Gold is gorgeous too)
  • A 3-Dimensional Glitter — I layered NYX Sparkling Glitter Powder in Disco Ball on top.
  • Black Liquid Liner — I used Urban Decay 24/7 Waterproof Liquid Eyeliner because the ultra-fine brush is super user-friendly.
  • Scotch Tape
  • Black Shimmer Eye Shadow — I used Stila Jewel Eye Shadow in Black Diamond because it’s softer than a matte black shadow.
  • Your Favorite Mascara — I used Maybelline Great Lash.
STEPS:
  1. Apply the light pink shadow all over the lid and crease.
  2. Press your finger in any kind of balm to get it slightly tacky. MAC Pro has a Mixing Medium that works great, but if you don’t want to make the investment, use a light layer of lip balm. Then press it in the 2-D glitter to load a light layer and stamp it across the lid.
  3. Press your finger in the 3-D glitter
  4. Stamp it across the lid and crease.
  5. Line your upper lid with the black liquid liner. Wing it out and up for a cat eye (optional).
  6. Wrap your finger with Scotch tape, making sure the sticky side is on the outside. Press it wherever glitter has dropped down on your cheeks to pick it up.
  7. Sweep the black shadow along the lower lashline (I concentrated it on the outer half but you can certainly apply it along the entire lashline).
  8. Finish with a couple coats of mascara.
I paired it with a hot pink lipstick (Dior Addict Extreme in Lucky) but you can rock a red too!

To schedule an appointment, give us a call at 831-373-2273.  You can also book online at www.montereydayspa.com

Like our Facebook page HERE 
Follow us on Twitter HERE
Visit our website HERE
View our pins on Pinterest HERE
 

article source: thebeautydepartment.com 

Thursday, October 10, 2013

Green Tea Antioxidant


What is this Green Plant that is more than just a tasty beverage, and is also great for your skin?

Voila! The answer is Green Tea!

Green Tea is good for all skin types and leaves your skin feeling nice and smooth. It is rich in antiseptic and astringent qualities. It reduces the large size of pores as well. I can say that this natural toner is good as sun protection and reduces inflammation cause by UV rays

Green Tea is a powerful antioxidant because it is reach in Polyphenols, a chemical that helps slow down the damage to your skin from the environment.

Green tea can use as a skin toner and aside from that Green tea can also be use as a facial treatment especially after a long day of stressful work.

Green Tea is rich in Vitamins C and E which according to research shows a powerful enemy of free radicals that causes our body to age. It can also be use all over your body to cleanse your skin,highlight your hair, relax your muscles and soothe puffy eyes.

More of Green Tea Benefits:

* Reduces and Prevents Acne
* Slows Signs of Aging
* Weight loss
* Lowers the risk of Cancer
* Stabilizes Cholesterol Levels
* Prevents Cardiovascular diseases
* Boosts your Immune System
* Reduces Tooth Decay
* Fights cause of Allergies

Green Tea is very refreshing and leaves you with a glowing complexion!


To schedule an appointment, give us a call at 831-373-2273.  You can also book online at www.montereydayspa.com


Like our Facebook page HERE 
Follow us on Twitter HERE
Visit our website HERE
View our pins on Pinterest HERE
 
Article source: dayspamagazine.com 

Wednesday, October 9, 2013

6 Ways for Men to Benefit from the Spa

The word “spa” has a unique way of frightening many otherwise brave men. The same guys who ride motorcycles, climb mountains, and jump out of airplanes are often deathly afraid of walking into the lobby of a spa. We can’t really blame them. In the beginning, many spas were very feminine and the treatments were mostly geared toward women. But, times are changing! Most spas now welcome men with open arms, offering unisex environments and plenty of treatments to choose from. Here’s a look at just a few of the ways that men across the country are now taking advantage of their neighborhood spa.

Massage Therapy
Massage has always been the favorite spa treatment for men. It gives them a chance to unwind, de-stress, and relax. Monterey Day Spa offers a wide range of massages, such as hot stone and deep tissue, which allows men to customize their massage according to their needs.

Manicures
Male nail grooming has become more important, as men regularly meet with clients, co-workers, and sales contacts. No one wants to close a deal with a guy who has dirt under his nails, unless he’s building you a house.

Waxing
The days of the uni-brow are over, which is evidenced by the fact that many electric trimmers now come standard with brow trimmers. An increasing number of men are visiting spas to remove the uni-brow, and then finding that a bit of brow grooming helps to polish the look. Why stop at brows? Many are signing up for a back wax, chest wax, or opting for laser hair removal.

Skincare
Most women will agree that men grow more handsome as they get older. However, many men would not agree, and they are always looking for ways to retain their youthful appearance. This is where the spa can help by offering skin treatments that improve hydration, reduce fine lines and wrinkles, restore collagen, reduce the size of pores, and more!

Sauna
Few men visit the spa without going into the sauna. Before or after a treatment, the benefit of sweating out some toxins for a few minutes while breathing in the dry heat is a great addition to any trip to the spa.

Homecare
Shopping for personal care items can be confusing for a lot of men. A spa professional who is well trained will help both men and women to choose the correct products for their skin type. Men are usually overjoyed to learn that they can get all of their personal care items from one place, and with the help of an expert.

If the men in your life don’t go to spas, maybe now is the time to invite them to join you for your next visit. Start with a massage for two; that way, he will feel more comfortable, and enjoy the experience!


To schedule an appointment, give us a call at 831-373-2273.  You can also book online at www.montereydayspa.com


Like our Facebook page HERE 
Follow us on Twitter HERE
Visit our website HERE
View our pins on Pinterest HERE
Article source: southwestdayspa.com

Tuesday, October 8, 2013

OPI's New Mariah Carey-Inspired Holiday Line

Recently, the well-known nail polish brand, OPI, announced a new collaboration with renowned recording artist and international superstar, Mariah Carey. This season, OPI will be launching a brand new line of limited-edition, Mariah-inspired holiday nail lacquers, dubbed, Mariah Carey Holiday. This seasonal promotion includes an assortment of brilliant red, warm burgundy, deep maroon and lush, chocolate brown hues, along with an array of glittery gold, bronze and pearl shades. Mariah Carey Holiday also features six new Liquid Sand™ lacquers, ranging from icy blue to frosted pink to sparkling graphite. Each of these unique Liquid Sand™ shades showcases OPI’s groundbreaking technology for a textured, matte finish infused with reflective sparkle.
All I Want for Christmas is OPI:  OPI's New Mariah Carey-Inspired Holiday Line
In total, the new line will include 18 beautiful nail lacquers, perfect for every moment of the holiday season. Among these festive shades are colors such as "Underneath the Mistletoe," a spicy-sweet, candy-apple red, "Warm Me Up," a rich, warm coffee color, "It's Frosty Outside," a sleek, wintery silver and "Wondrous Star," a shimmer polish with flecks of gold.

“Mariah Carey is truly synonymous with the holiday season,” says Suzi Weiss-Fischmann, OPI Executive VP & Artistic Director. “People around the world listen to her festive, iconic songs – ‘All I Want for Christmas is You’ is a personal favorite – and these 18 lacquers evoke the warmth, beauty, energy and positive spirit that’s present in Mariah’s music.

Mariah Carey Holiday by OPI places a heavy emphasis on the season's hottest nail trends, “red, glitter and texture for nails,” according to Weiss-Fischmann. “The 12 crème and glitter lacquers include classic reds, champagne gold, and warm burgundies, while the six Liquid Sand shades should be worn without top coat for a matte finish in icy, frosted colors.”

Mariah Carey Holiday nail lacquer shades each feature OPI’s exclusive ProWide™ Brush for the ultimate in application. Liquid Sand nail lacquers should always be worn without top coat. The seasonal line will be available October 2013, at Professional Salons, including Beauty Brands, Beauty First, Chatters, Dillard’s, JCP Salons, Pure Beauty, Regis, Trade Secret, and ULTA.

For more information, please visit www.opi.com
[Image courtesy of Harris Shepard Public Relations, Inc.]

To schedule an appointment, give us a call at 831-373-2273.  You can also book online and view our treatments at www.montereydayspa.com
 
Like our Facebook page HERE 
Follow us on Twitter HERE
Visit our website HERE
View our pins on Pinterest HERE  

Wednesday, September 25, 2013

Best Simple Tips for Beautiful, Healthy Nails

Nail Care Tips from Experts


With the advent of shellac and gel manicures, nail polish stickers, and new nail decorating tools (not to mention the seemingly infinite number of Pinterest boards dedicated to nail art), rocking gorgeous, killer nails is becoming increasingly more important to us ladies. And we all know that nothing kills a mani/pedi like brittle, weak, unhealthy nails. So to get and keep your nails in the best shape possible, we’ve aggregated some of our favorite expert healthy nail tips.    


Prevent Brittle, Weak Nails

One of the biggest culprits causing brittle, weak nails is nail polish remover. Dermatologist Dr. Debra Price explains, “All nail polish removers contain solvents that strip the nail polish from the nail plate. This can dry the nail plate and contribute to brittle nails. While non-acetone nail polish [removers] may be slightly less drying, they may require more rubbing to remove the nail polish.”  

To prevent this damage caused by removing your nail polish, Dr. Price says it’s not what you use, but how often. “The best way to prevent dehydration of the nails from nail polish remover is to limit the use to not more than once a week, or less frequently if possible.” Everything in moderation, people.    


Strengthen Your Nails

The stronger your nails, the better off you and your manicure are (especially if you’re trying to rock the natural, longer nail look). While it can seem like the whole waiting-for-a-pot-to-boil syndrome, there are ways to speed up the process of getting stronger beautiful nails.  

“If you are worried about the strength of your nails, add some natural non-flavored gelatin into your diet or use as a supplement,” explains certified holistic health coach Heather Vargas, adding that you can find these nail boosters at most local health food stores.   

To strengthen nails, Dr. Price recommends a treatment applied directly to the nails along with a supplement. She explains, “Leaving nail polish off the nails temporarily, applying a lactic acid moisturizer like Amlactin XL and taking Biotin supplements (2.5 mg daily) can be helpful in improving dry, brittle nails.”  

Clinical pharmacist Dr. Stacey McCoy agrees that a biotin supplement can be beneficial to improve nail strength, but emphasizes, “One of the best and safest ways to receive biotin is through your diet.” Biotin-rich foods include whole grain cereals, whole wheat bread, eggs, dairy and lean proteins like salmon and chicken.   Other benefits of including whole grains and lean protein in your diet? They’ll help you fend off pesky hunger pangs.

Maintain Your Cuticles When your manicurist asks if you want your cuticles cut or pushed back, it’s not clear which is the right choice for your nail health. While it may be common to cut the cuticle in some nail salons, the experts warn against this practice. “It is best not to cut cuticles as they protect the nail from infection,” explains dermatologist Dr. Debra Jaliman. She also adds that cutting your cuticles could cause you to get a skin infection (usually bacterial).  

Instead of throwing an open house party for skin bacteria, Dr. Jaliman recommends wrapping an orange stick with cotton and pushing the cuticle back gently. If you’re doing this yourself, you can make the process a little easier by doing it after you get out of the shower or the bath. The cuticle area will be softer then, after your fingers have soaked in warm water.  

If you’re having trouble with hangnails or inflamed cuticles, it’s important to make sure you’re getting enough vitamins and minerals in your diet--particularly zinc. For your zinc fix, munch on nuts, seeds and carrots. This will improve both your nails and skin.


To Shellac or Not to Shellac

Shellac manicures definitely have their pluses. Your shiny, chip-free polish will stay perfectly put for a solid week and a half--sometimes even two weeks or longer. But with a product that innovative, you want to make sure there are no hidden downsides, especially considering all the toxic chemicals that can be found in some of our beauty products.  

Shellac, Vargas explains, is made from a red, hardened secretion from an insect found in Thailand, India and Burma. The secretion is then added to ingredients found in furniture polish, dentistry and cosmetic products.  

“There are little toxicity reports to date,” Vargas says. “However, I would [advise] to use with caution, as I’m sure there are other ingredients that may be toxic that go into making Shellac for nails.”   If you want to be extra cautious, she recommends opting for a natural polish from brands like Zoya, Priti NYC, Essie, Keeki or Piggie Paint. Julep is also a great non-toxic brand to try.  
 
To schedule your manicure appointment, give us a call at 831-373-2273
You can also book online at www.montereydayspa.com
Like our Facebook page HERE Follow us on Twitter HERE
Visit our website HERE
View our pins on Pinterest HERE

Article source: ChickRX

Tuesday, September 10, 2013

Simplest Nighttime Bathroom Routine Needed to Get By

Bare Minimum Beauty & Hygiene Routine for Lazy Nights


You’ve probably read all about what you need to be doing before bed to maintain and improve your skin, and it can amount to a long, daunting list. Removing your makeup, cleansing, exfoliating, using masks, applying toner, dabbing on acne treatments, moisturizing, slathering on eye cream, etc. Then there’s the work to maintain basic hygiene: brushing, flossing, mouthwash, eye care, washing your hair, etc. That’s a lot of tedious work when all you want to do is unwind and get to bed.    

So for the days when you’re feeling particularly lazy, we’ve pared down that nighttime routine list to the bare minimum experts recommend you should be doing to stay in proper form, based on your specific issues and needs.      


Facial Cleansing
Whether you’re wearing makeup or not, it’s important to wash your face to remove the dirt and germs you pick up in day-to-day life and whenever you touch your face. Washing your face gives your face a clean slate, so to speak, so your skin can embark on its natural exfoliating and rejuvenation process while you sleep. This is probably why some research has shown that cleansing before bed can give keep your skin more youthful.  

But for those tired, lazy nights, just how diligent you need to be with your face washing depends on your skin type.  

Dry Skin (or Normal)

For dry skin, you have a little leeway when it comes to your facial cleansing. Opt for a creamy (non-soap) cleanser, which has moisturizing properties. Wet your face with warm water, work the cleanser into your skin using your fingers and then rinse and pat dry with a clean towel. Make sure the water is not too hot as this can make your skin feel tight and dry it out even more. Though your skin needs extra moisture, you can skip it every now and then if you’ve used a moisturizing cleanser.  
Absolute worst case, in the laziest of scenarios, with dry skin you’re more able to get away with just splashing your face with water and rubbing it off with a clean towel. This will remove a basic layer of makeup, dirt, etc. that’s on your skin before bed.  

If you’ve missed a little makeup residue on your skin from your quick cleansing routine, just know that the makeup may slightly dehydrate your skin, licensed esthetician Daniela Ferri explains. She says that leaving makeup on overnight will not cause you to have more wrinkles, but if you have dry skin and it becomes drier from sleeping in your makeup, the dehydration will make your skin appear dull, lackluster and can magnify existing wrinkles.    

Oily or Acne-Prone Skin
If you have oily or acne-prone skin, it’s particularly important to make sure you cleanse before bed to remove makeup, excess oils and dirt so you don’t wake up to a breakout. Licensed esthetician Daniela Ferri explains that foundation and powder create a barrier on your skin, and if you’re also producing excessive oil, your pores will quickly get clogged. This leads to blackheads and breakouts.  
To remove makeup and grime, dampen your face with warm water and lightly apply a cleanser formulated for oily or acne-prone skin with your fingers. Rinse thoroughly and pat your skin dry with a clean towel.

Or, for a faster approach, simply scrub your face with facial wipes or pads that contain salicylic acid or benzoyl peroxide (likely the same ingredients in your cleanser)—keep the wipes by your bed if you’re feeling extra lazy.      


Eye Makeup Removal

Regardless of your skin type, it’s important to wash off your eye makeup most nights. Keeping your eye makeup on can lead to eye infections and clogged pores in your eyelids, which can lead to those painful little styes and puffy red eyes.  

You can quickly remove eye makeup with makeup remover pads (keep them next to your bed if it means you’re more likely to use them). If you skip the eye makeup removal now and then, it’s not likely to lead to problems, but try to avoid making a habit of it—your skin and pillowcases will thank you.      


Moisturizers & Eye Creams

One of the best things you can do to prevent wrinkles from forming is not to apply moisturizer, but to protect your skin from the sun. Because of this, if you’re tired, go ahead and skip your moisturizers and eye cream without feeling guilty. In the morning, you can apply a daily moisturizer and, of course, make sure to apply sunscreen.  

(For dry skin, make sure you’ve read the section above on using a moisturizing facial cleanser.)  

If you have aging skin, and it’s dry to normal (not oily or acne-prone), you may want to be more vigilant with your night creams. So if you’ve skipped a thorough facial cleansing on a lazy night, you can still apply your anti-aging moisturizer before you hit the sheets—it may be more difficult for it to penetrate your skin, but you’ll still derive benefits from it.  


Dental Hygiene 
 “The recommended brushing time is between 2 to 3 minutes per session with a minimum of two brushing sessions per day,” says dentist Marielaina Perrone, DDS. That being said, we get it, you don’t always want to brush when you’re exhausted—but you really should. So, to cut corners, instead of waiting until bedtime to brush those pearly whites, do it just after you’ve finished dinner. This might also help deter after-dinner munchies (double bonus!).  

When it comes to flossing, doing it twice a day would be great, but you really just need to make sure you’re getting it done once a day to fight gum disease. This once-a-day floss can be done when you brush after dinner or even at another time, when you have more motivation, during the day.  

As for mouthwash, you don’t really need it. Properly brushing and flossing are enough to do the trick, so unless you just can’t sleep without the minty aftertaste of mouthwash, you can skip it.    


Hair Washing
If you’re debating washing and styling your hair before bed because you know you won’t have time in the morning, just go ahead and skip it. Skipping washes is actually beneficial for the health, color preservation and shine of your hair. Washing too frequently depletes the healthy oils from your hair leaving it lackluster and even frizzy.  
In the morning, if your hair is looking oily, spritz on dry shampoo (or even baby powder) and style as usual. Worst case, you can always rock the low, chic bun look.      

Eye Health

In an ideal world, you would only wear your contacts maximum eight hours per day, but we all slip up on that. If you do wear contacts, though, make sure you wash your hands thoroughly and remove your lenses before bed (or earlier, if you can). Contact lens overuse can cause serious, painful damage to your eyes by blocking oxygen from reaching your cornea amongst other things.      

Schedule your appointment with us today by calling 831-373-2273 You can also book online at www.montereydayspa.com


Like our Facebook page HERE
Follow us on Twitter HERE
Visit our website HERE
View our pins on Pinterest HERE

Article source: ChickRX

Thursday, September 5, 2013

6 Ways to Lighten Armpits & Bikini Area

Remedies for Darkened, Irritated Skin

If you’ve ever been shy about wearing a sleeveless shirt or bikini because of darkened areas of skin, you’re not alone. Hyperpigmentation near sensitive areas you frequently shave or wax is common. The good news is there is a solution. We’ve assembled six expert-recommended ways you can lighten your skin and prevent new areas from darkening.


First: The Cause
Oftentimes, frequently shaving the bikini area and underarms can cause the skin to darken, especially if you’re prone to ingrown hairs and nicks, which can leave the skin sensitive and result in scarring or hyperpigmentation.

Chemicals can also darken your skin—think deodorant/antiperspirant. But then again, excessive sweat can also darken underarms. So avoiding antiperspirants all together isn’t necessarily the solution (or pleasant!).

However, there can also be a much larger culprit behind the darkened skin than just on the surface. “Darker skin in your armpits can be a sign of a hormone imbalance,” explains gynecologist Dr. Carrie Swartz. It can also signal insulin resistance, and other health conditions that shouldn’t be left unchecked. Because of this, Dr. Swartz recommends bringing the issue up with your doctor or your dermatologist before attempting to remedy the situation yourself, just to be on the safe side. 


Chemical-Free Deodorant
Once you’ve ruled out underlying health issues, an all-natural deodorant may be the key to remedying your sensitive underarm skin. There are many popular brands that have made the move to chemical-free or less chemical-containing beauty products.

Try to avoid deodorants and antiperspirants that contain aluminum, a possible irritator and skin-darkening culprit. Be sure to check the ingredient panel carefully, because just because a product is labeled “all-natural” doesn’t always mean it is.

If you’re feeling crafty, certified master elite trainer Christina Estrada shares her recipe for all-natural deodorant perfect for sensitive skin below:

All-Natural Deodorant Ingredients:
1/4 cup coconut oil
1/4 cup baking soda
1/4 cup corn starch or arrowroot powder
Essential oil drops (optional)

Blend the first three ingredients in a bowl until smooth. For fragrance, you can mix in a few drops of your favorite essential oil. Add about 1/4 teaspoon under each arm and rub in well. Store the extra deodorant in an air-tight container.


Whitening Deodorant
To prevent excess sweating/odor while treating any hyperpigmentation, you could try a whitening deodorant. There are several on the market with different ingredients, so make sure you find one that’s gentle on your skin to prevent further irritation and pigmentation.

Look for a whitening deodorant that moisturizes while lightening the existing dark spots to help relieve irritation after shaving. Check out ones containing sunflower oil, which is a great moisturizer for underarms.


Exfoliate
Dead skin cells don’t just build up on your elbows and knees. They can accumulate in the underarm and bikini areas, irritating the skin and making it appear duller and darker.

Before shaving, you should exfoliate using a scrub, loofah or exfoliating brush. This will help remove the dry skin and has the added benefit of helping to prevent ingrown hairs and skin irritation in the bikini area.

 Schedule your appointment with us today by calling 831-373-2273 You can also book online at www.montereydayspa.com


Like our Facebook page HERE
Follow us on Twitter HERE

Visit our website HERE
View our pins on Pinterest HERE
Article source: ChickRX

Wednesday, August 7, 2013

Permanent Makeup Video

We are very excited to offer permanent makeup at Monterey Day Spa!  For an inside look at how the process works, take a look at this video with our very own Licensed Esthetician Julie Richard.


Schedule your appointment with us today by calling 831-373-2273 You can also book online at www.montereydayspa.com

Like our Facebook page HERE

Follow us on Twitter HERE

Visit our website HERE

View our pins on Pinterest HERE

Thursday, June 6, 2013

5 Shaving Secrets

 Shaving Secrets  We asked Gillette Venus dermatologist Ellen Gendler, M.D., clinical associate professor at New York University School of Medicine who answered our burning questions about shaving. She has seen and treated every hair removal issue under the sun during her 26 years practicing in New York City.

Check out our interview:
  • What type of razor is the best choice for dry skin? If you have dry, sensitive skin, choose a razor with a have pivoting head, rather than a straight head, which has harsh angles that can damage skin. I like the Gillette Venus ProSkin Moisture Rich Razor because the head moves with the contours of your body, plus it has a shave gel bar built right in. It’s easy to travel with because you don’t even need to carry shaving cream.

  • Is shaving before or after a workout better for our skin? I would say that there’s really no difference, as long as you shave in the shower. Never dry shave! 

  • Is it bad to leave a razor in the shower near the running water in between uses?You should not leave your razor in a wet area because harmful bacteria can build up on it and rust can form, which warps the blade, risking nicks and cuts. Many razors come with cases that can be suctioned to the shower wall to help keep the razor dry when not in use. Also, if you expose razors with built-in shaving cream bars to water when you’re not using them, the shave gel will disintegrate.
Of course the other alternative is to come in and see us at Monterey Day Spa for a wax appointment!