Showing posts with label beauty tricks. Show all posts

Thursday, July 17, 2014

You're Doing it Wrong!

The Makeup Trick You're Doing Wrong Every Day


For years and years now, anytime you asked a makeup artist for a how-to about highlighting and contouring they’d usually give you the same old tip about adding highlighter from the outer part of your brow all the way around the outside of your eye. But the times they are a-changin’.

Celebrity makeup artist Rebecca Restrepo recently clued us in to the updated technique she’s been using on clients, including Alicia Keys at the "The Amazing Spiderman 2" premiere. “The new highlighting technique is to add the highlighter shade to the inside corner of the eye (the area in between the bridge of the nose and the tear duct) helping to brighten the eye and give a well rested look,” she says. “This is the modern, fresh way to highlight. I like it better because it makes the eye brighter and softens the look of the eye while still enhancing definition and pop.” One of her favorite products to use for this is Elizabeth Arden Beautiful Color Define and Highlight Eyeliner Duo.

"It tends to make your eyes appear slightly farther apart, which a lot of people with close set eyes enjoy," explains YouBeauty Makeup Expert Emily Kate Warren. She says to use a fluffy-but-small blender brush to dust onto your tear duct area and toward the direction of the middle of your lid.

Warren also thinks there's still an eye-lifting benefit for using light color under the brow bone as long as it's matte—the white shimmer is so bad-90s. She likes the Benefit High Brow pencil and offers this tip: "Scribble on the back of your hand and then use an eyeshadow brush to feather it under your brow."

And if you haven’t been into highlighting in the past, Restrepo thinks this is the perfect time to start. “Highlighting is important because it brings structure and balance to the face. When done correctly it sculpts the face while giving the skin a luminous look. I created the Elizabeth Arden Summer Escape Pure Finish Cool Radiance Highlighter for that purpose. In the summer, we are out more and showing more skin. A glow is beautiful all year round, but the summer is the perfect time to show off radiant skin.”

Needless to say, we’re definitely game for any trick this easy that makes us look younger and more radiant.

Call and schedule your appointment today!  831.373.2273 or book on line at www.montereydayspa.com


Purchase products from our online store HERE 
Like our Facebook page HERE
Follow us on Twitter HERE

Visit our website HERE
View our pins on Pinterest HERE
article source: youbeauty.com

Tuesday, January 14, 2014

DIY Hair Masks

Get gorgeous hair from using at-home ingredients

There’s nothing like shiny, luscious locks to turn heads, but with blow drying, flat ironing, and color treatments, we’re often left with a head of brittle, lackluster hair.

“Damaged, dull hair can be temporarily repaired through the use of conditioners that mend the damaged hair shaft, increasing shine and smoothing split ends,” ChickRx dermatologist Dr. Debra Price explains.

Because we can’t always splurge on expensive salon conditioning treatments, we’ve compiled five easy DIY hair mask recipes to get you back to envious hair in no time. Even better: you probably have most of the ingredients in your kitchen right now!

Avocado + Egg + Lemon
Combine 1 avocado, 1 egg and a very small amount of lemon juice until mixed well. Apply the mixture to damp hair and leave on for about 20 minutes. Rinse hair with luke warm water—hot water could cook the egg leaving a huge mess! After you’ve rinsed your hair, shampoo and condition as normal.

Honey + Olive Oil + Apple Cider Vinegar
Mix 2 tablespoons honey, 1 tablespoon olive oil and 1 tablespoon apple cider vinegar. You may want to heat the honey briefly in the microwave so that is easier to mix in. Apply mask to dry, dirty hair. Comb through with a wide-tooth comb or your fingers. Pin up your hair for 30 minutes to an hour. Shampoo and condition as normal.

Banana + Honey + Yogurt
Mix 1 mashed banana, 1/4 cup honey and about 3 oz of plain yogurt. If you have long hair, you may need to use more yogurt for the recipe to be enough. Coat dry hair with the mixture and leave on for an hour. Rinse and shampoo as normal.

Banana + Egg + Beer + Honey
Mix 1 mashed banana with 1 egg until well blended. Add in 1/2 cup of beer and 1 tablespoon honey. Mix well then apply to hair. Pin hair up (or use a shower cap) and let sit for a few hours. Rinse with luke warm water then shampoo and condition as usual. This mask can be especially helpful if you are looking to add volume and shine to thin hair… and you get to finish off the rest of the beer in that bottle.

If your pantry is looking a little bare, you can also just go with one single ingredient for a quick fix.

Coconut Oil
Apply a liberal amount of coconut to dry hair until strands are coated root to tip and leave in over night. You might want to use a shower cap so you don’t get the coconut oil on your pillow. After catching up on your beauty sleep, shampoo and condition as normal. You may need to shampoo twice, depending on your hair.

Registered dietitian and nutritional expert Carlene Thomas says, “I love using a DIY hair mask with either olive oil, mayo or avocado." She instructs, “Spread over hair and let it soak in and hydrate strands, then rinse and shampoo out.”

Now Protect
After you’ve treated yourself to one of these awesome treatments, be sure to protect your revitalized mane.

“To prevent hair damage during all seasons, you should avoid excessive blow drying, chemical processing, dying or perming your hair,” Dr. Price recommends. “Comb wet hair with a wide bristled comb and try to minimize brushing while blow drying your hair.”

And don’t forget your skin isn’t the only thing that needs protecting from the damaging UV rays of the sun. “If you live in a sunny climate you should consider wearing a hat during periods of prolonged sun exposure to protect your hair,” Dr. Price suggests.

Make sure you’re eating healthy, too. Believe it or not, your diet shows through in your skin and hair probably more than we realize. “Hair can really show our diet quality. If the body isn't getting enough calories, healthy fats, and especially protein, it can become dull and lifeless,” Carlene Thomas advises.

 Book your appointment online now at www.montereydayspa.com!

Purchase products from our online store HERE 


Like our Facebook page HERE 
Follow us on Twitter HERE

Visit our website HERE
View our pins on Pinterest HERE
 

Article source: youbeauty.com

Wednesday, November 6, 2013

6 Ways to Treat Red Bumps & Ingrown Hairs from Shaving or Waxing

How to Treat Razor Bumps & Skin Irritation


Those red bumps, irritation and ingrown hairs all caused by shaving or waxing
are the last thing you want to see…let alone in your nether regions. Questions
about how to get rid of those unsightly, embarrassing bumps are among the most
frequently asked on ChickRx. So we’ve compiled six effective strategies you can use
to treat those rash-like red bumps next time your skin decides to go haywire after a
wax or shave.


First: A Word On Preventing Red Bumps
Of course, the key to not having to deal with ingrown hairs and skin irritation is to
prevent them altogether. So before your next shave or wax, follow these important
steps:
  • Make sure you are never waxing or shaving skin that is already irritated. If your skin is particularly inflamed or broken out with bumps, waxing or shaving will further irritate the area and could even lead to serious skin infections or scarring.
  • Exfoliate the area before you wax or shave.
  • Before you shave (assuming your skin is not irritated), make sure you soak in warm water or let your skin absorb the hot steam from the shower for at least three minutes. 
  • Apply a protective shave gel rather than a cream as creams can clog your pores.
  • Make sure you’re using a clean, sharp razor (a new one if it’s disposable), shave in the direction of the hair growth, and do not pull the skin tight to try to get a closer shave (yep, this can cause ingrown hairs).

Manual Exfoliation 
If you do get red razor bumps, though, let’s talk about how to treat them. Those
bumps are caused by ingrown hairs—hair that curls back on itself and grows into
the skin, causing inflammation and redness. Sometimes these ingrown hairs/bumps
also get infected, causing folliculitis.

“The best way to treat [ingrown hairs] is to exfoliate well and consistently,” explains
dermatologist Dr. Debra Jaliman. The goal with exfoliating is to loosen skin
cells and impactions so the hair will be released from the blocked hair follicle.
Dr. Jaliman recommends using a sonic cleansing system like the Clarisonic, or the
versions made by Neutrogena and Olay. If you’re not already using one of these
skincare tools for your face and don’t want to invest, you can always use a loofah
instead.

Just make sure that if you use a loofah, you switch it out regularly to avoid
contaminating your fresh, clean skin with bacteria. 


Chemical Exfoliation 
If manual exfoliation alone isn’t cutting it for treating your bumps, licensed
esthetician Daniela Ferri recommends trying a chemical exfoliant.
The best way to do this is by using an acne wash that contains salicylic acid or
benzoyl peroxide. Gently massage it onto the affected skin with exfoliating spa
gloves, rinse with warm water and pat drying, being careful not to tug or rub too
much on the skin—this will only cause more skin damage and inflammation.

Salicylic acid and benzoyl peroxide have anti-inflammatory properties that can help
treat redness and irritation, but Ferri warns that for some they can be too over-drying.
After exfoliating either chemically or manually, you can apply products to further
treat and soothe your irritated skin.


Aspirin Mask
To help reduce redness and inflammation, you can apply an aspirin mask to the area
with razor burn. Dissolve two aspirin pills in a few drops of water until you achieve
a paste-like consistency. Apply this to the affected area for a few minutes and then
rinse off completely.


All-Natural Options: Tea Tree Oil & Aloe Vera
You can also take an all-natural, organic approach to soothe razor burn or irritated
skin. Try applying either tea tree oil or aloe vera to the skin using a clean cotton ball.
These naturally soothing products will help to calm the skin and reduce redness and
sensitivity, and you don’t have to worry about any added chemicals or ingredients
that might be irritating for sensitive skin.


Over-the-Counter Products
If you tend to get more severe outbreaks of bumps, you can apply products like
Tendskin or FerroRosa FrictionFixTM, which ChickRx experts recommend. These
products work by reducing inflammation and itching while reducing refraction, and
absorbing moisture and oil that can lead to further breakouts.

If you can’t easily get these products, you can also try a topical corticosteroid cream
(hydrocortisone cream), which helps reduce inflammation and pain.
If you still do not see improvement, visit your doctor who can prescribe antibiotic
creams to remedy the situation.


No Picking, Itching or Friction
Although ingrown hairs and irritation may induce you into a fit of itching and
scratching, try not to. This will only irritate the area further and slow your skin’s
healing process. And under no circumstances, should you pick at any bumps that are
inflamed—you know better.

For the underarms, avoid wearing constructing tops to prevent fabric from rubbing
on the skin, as this can hinder the healing process and also cause more bumps to
form. Pass on wearing rough pant materials (like jeans) for a few days if you’re
dealing with a bout of sensitivity on your legs or bikini area and stick to wearing
only cotton underwear (other types of underwear fabric—and g-strings—can cause
friction against your skin and prevent proper healing).

And don’t forget to shower right after your workouts. This will not only help treat
bumps from shaving, but prevent blemishes from forming on your back as well.

To schedule an appointment, give us a call at 831-373-2273.  You can also book online at www.montereydayspa.com

Like our Facebook page HERE 
Follow us on Twitter HERE

Visit our website HERE
View our pins on Pinterest HERE

Article source: chixrx.com

Wednesday, October 16, 2013

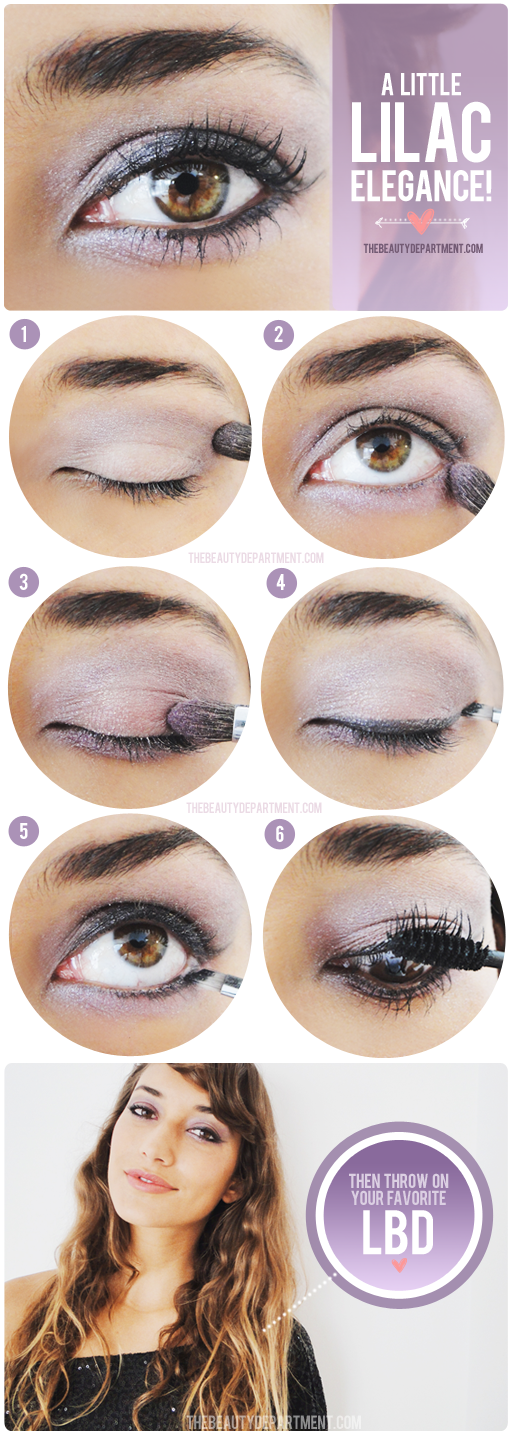
Pretty Party Eye Makeup Tutorial


PRETTY PARTY EYE

POST + PHOTOGRAPHY BY AMY NADINE, GRAPHIC DESIGN BY EUNICE CHUN

With Homecoming just around the corner, here’s a gorgeous makeup look to get you inspired! And for those of us who’ve already graduated, try this look on your next night out! It’s very feminine and looks especially gorgeous with green and hazel eyes because purple is the complimentary color of green and looks stunning on brown eyes as it brings out any green or yellow flecks in the brown. Those of us with blue eyes can definitely rock it too (I have!). Then pair it with a peach cheek & lip and an LBD like I did on Brook Power above! Here’s how:


TOOLS:
  • Lilac Shadow Palette — I used  LancĂ´me Color Design 5 Shadow & Liner Palette in Orchid Splendor because I love the separate matte and shimmer versions of lilacs (so many palettes out there are either all matte or all shimmer/metallic). You could also try Revlon PhotoReady Shadow Palette in Watercolors, developed by one of my peers, makeup artist Gucci Westman.
  • Black Gel Liner — I used Bobbi Brown Gel Liner in Black Mauve, a softer version to black with hints of mauve that glides on smoothly.
  • Your Favorite Mascara — I used Covergirl Exacts Eyelights Mascara in Black Pearl because it’s designed to brighten brown eyes and make them come to life! Yes, they have shades for other eye colors too!
STEPS:
  1. Sweep the matte lilac shadow all over the lid and crease.
  2. Trace the same shade along the lower lashline.
  3. Press the shimmer lilac shadow on the center of the upper lid a couple times to make it pop.
  4. Using an angled liner brush, sweep the gel liner across the upper lashline and wing it up and out for a little flick.
  5. Line the lower lashline with the same liner and brush, making it thicker as you work from the inner corner to the outer corner (remember, to make a line thicker you simply press harder!).
  6. Apply a couple coats of mascara to the top and bottom lashes.
If you like articles like this, comment and let me know!  If there is something you want to see more or less of, let me know that too!

Don't forget, we offer bridal hair and makeup services!  To schedule an appointment, give us a call at 831-373-2273.  You can also book online at www.montereydayspa.com


Like our Facebook page HERE 
Follow us on Twitter HERE
Visit our website HERE
View our pins on Pinterest HERE
 

article source: thebeautydepartment.com 

Thursday, October 10, 2013

Green Tea Antioxidant


What is this Green Plant that is more than just a tasty beverage, and is also great for your skin?

Voila! The answer is Green Tea!

Green Tea is good for all skin types and leaves your skin feeling nice and smooth. It is rich in antiseptic and astringent qualities. It reduces the large size of pores as well. I can say that this natural toner is good as sun protection and reduces inflammation cause by UV rays

Green Tea is a powerful antioxidant because it is reach in Polyphenols, a chemical that helps slow down the damage to your skin from the environment.

Green tea can use as a skin toner and aside from that Green tea can also be use as a facial treatment especially after a long day of stressful work.

Green Tea is rich in Vitamins C and E which according to research shows a powerful enemy of free radicals that causes our body to age. It can also be use all over your body to cleanse your skin,highlight your hair, relax your muscles and soothe puffy eyes.

More of Green Tea Benefits:

* Reduces and Prevents Acne
* Slows Signs of Aging
* Weight loss
* Lowers the risk of Cancer
* Stabilizes Cholesterol Levels
* Prevents Cardiovascular diseases
* Boosts your Immune System
* Reduces Tooth Decay
* Fights cause of Allergies

Green Tea is very refreshing and leaves you with a glowing complexion!


To schedule an appointment, give us a call at 831-373-2273.  You can also book online at www.montereydayspa.com


Like our Facebook page HERE 
Follow us on Twitter HERE
Visit our website HERE
View our pins on Pinterest HERE
 
Article source: dayspamagazine.com 

Wednesday, September 25, 2013

Best Simple Tips for Beautiful, Healthy Nails

Nail Care Tips from Experts


With the advent of shellac and gel manicures, nail polish stickers, and new nail decorating tools (not to mention the seemingly infinite number of Pinterest boards dedicated to nail art), rocking gorgeous, killer nails is becoming increasingly more important to us ladies. And we all know that nothing kills a mani/pedi like brittle, weak, unhealthy nails. So to get and keep your nails in the best shape possible, we’ve aggregated some of our favorite expert healthy nail tips.    


Prevent Brittle, Weak Nails

One of the biggest culprits causing brittle, weak nails is nail polish remover. Dermatologist Dr. Debra Price explains, “All nail polish removers contain solvents that strip the nail polish from the nail plate. This can dry the nail plate and contribute to brittle nails. While non-acetone nail polish [removers] may be slightly less drying, they may require more rubbing to remove the nail polish.”  

To prevent this damage caused by removing your nail polish, Dr. Price says it’s not what you use, but how often. “The best way to prevent dehydration of the nails from nail polish remover is to limit the use to not more than once a week, or less frequently if possible.” Everything in moderation, people.    


Strengthen Your Nails

The stronger your nails, the better off you and your manicure are (especially if you’re trying to rock the natural, longer nail look). While it can seem like the whole waiting-for-a-pot-to-boil syndrome, there are ways to speed up the process of getting stronger beautiful nails.  

“If you are worried about the strength of your nails, add some natural non-flavored gelatin into your diet or use as a supplement,” explains certified holistic health coach Heather Vargas, adding that you can find these nail boosters at most local health food stores.   

To strengthen nails, Dr. Price recommends a treatment applied directly to the nails along with a supplement. She explains, “Leaving nail polish off the nails temporarily, applying a lactic acid moisturizer like Amlactin XL and taking Biotin supplements (2.5 mg daily) can be helpful in improving dry, brittle nails.”  

Clinical pharmacist Dr. Stacey McCoy agrees that a biotin supplement can be beneficial to improve nail strength, but emphasizes, “One of the best and safest ways to receive biotin is through your diet.” Biotin-rich foods include whole grain cereals, whole wheat bread, eggs, dairy and lean proteins like salmon and chicken.   Other benefits of including whole grains and lean protein in your diet? They’ll help you fend off pesky hunger pangs.

Maintain Your Cuticles When your manicurist asks if you want your cuticles cut or pushed back, it’s not clear which is the right choice for your nail health. While it may be common to cut the cuticle in some nail salons, the experts warn against this practice. “It is best not to cut cuticles as they protect the nail from infection,” explains dermatologist Dr. Debra Jaliman. She also adds that cutting your cuticles could cause you to get a skin infection (usually bacterial).  

Instead of throwing an open house party for skin bacteria, Dr. Jaliman recommends wrapping an orange stick with cotton and pushing the cuticle back gently. If you’re doing this yourself, you can make the process a little easier by doing it after you get out of the shower or the bath. The cuticle area will be softer then, after your fingers have soaked in warm water.  

If you’re having trouble with hangnails or inflamed cuticles, it’s important to make sure you’re getting enough vitamins and minerals in your diet--particularly zinc. For your zinc fix, munch on nuts, seeds and carrots. This will improve both your nails and skin.


To Shellac or Not to Shellac

Shellac manicures definitely have their pluses. Your shiny, chip-free polish will stay perfectly put for a solid week and a half--sometimes even two weeks or longer. But with a product that innovative, you want to make sure there are no hidden downsides, especially considering all the toxic chemicals that can be found in some of our beauty products.  

Shellac, Vargas explains, is made from a red, hardened secretion from an insect found in Thailand, India and Burma. The secretion is then added to ingredients found in furniture polish, dentistry and cosmetic products.  

“There are little toxicity reports to date,” Vargas says. “However, I would [advise] to use with caution, as I’m sure there are other ingredients that may be toxic that go into making Shellac for nails.”   If you want to be extra cautious, she recommends opting for a natural polish from brands like Zoya, Priti NYC, Essie, Keeki or Piggie Paint. Julep is also a great non-toxic brand to try.  
 
To schedule your manicure appointment, give us a call at 831-373-2273
You can also book online at www.montereydayspa.com
Like our Facebook page HERE Follow us on Twitter HERE
Visit our website HERE
View our pins on Pinterest HERE

Article source: ChickRX

Tuesday, September 17, 2013

How to Fade and Smooth Different Types of Scars


Expert Recommended Tips to Reduce the Appearance of Old & New Scars


Some scars are cool, some are a beautiful part of your life story, and others are these ugly things you’d love to erase. We’ve compiled the top ways to treat your existing scars—from those caused by acne, chicken pox, burns and cuts to deep raised keloid scars—and tips to proactively treat wounds and new scars so that they don’t leave a permanent mark.      


Acne Scars (Non-Pitted)
As if the actual breakout wasn’t enough, once your skin clears you may be left with telltale discolored marks.  

Scars form where acne lesions once were. “Extra blood vessels form around the wound [and] pigment [is] released as part of the healing process,” explains licensed esthetician and acne specialist Daniela Ferri.  

The coloring of acne scars differs depending on your skin tone. In lighter skin tones, Ferri explains that you don’t see a very dark mark, ”but you will see redness lingering from all the little extra blood vessels.” In darker skin tones, however, you won’t see much redness but you will “see a dark mark from all the leftover pigment” in the skin.    

To immediately reduce redness or pinkness from scarring, try tabbing green concealer over the marks before applying your foundation. This can help to counterbalance the redness and blend the scar into your skin tone.  

Ferri recommends a three-step approach to permanently reduce the discoloration caused by acne scars (this also works for discolored marks caused by other types of wounds):
 

First, and the most important thing you can do to reduce the appearance of these marks, is to apply sunscreen (think SPF 30 or greater) before any type of sun exposure, year round. Without protection, the sun’s UV rays will actually darken the scar’s pigment rather than fading it into a tan.  

Second, Ferri recommends a properly formulated alpha hydroxy acid gel, which will help remove pigmented, damaged cells. There are several over-the-counter products you can use, but proceed with caution as they may cause irritation and redness in people with sensitive skin. You can also ask your  esthetician for an alpha hydroxy acid peel to reduce the appearance of scars.  

Third, use “a properly formulated, broad-spectrum, high potency antioxidant serum or lotion, with a focus on Vitamin C,” Ferri says. Vitamin C can help reduce inflammation and help lighten dark scars. Kojic acid and arbutin (bearberry extract) are other natural ingredients to look for in a serum or lotion, as they’ve been shown to help lighten dark marks.  

Or, if it’s not too harsh on your skin, you could use a topical lightening cream containing hydroquinone to reduce the discoloration caused by acne or other types of older scars, explains dermatologic surgeon Dr. Joseph Sobanko.    


Pitted Scars (Acne or Chicken Pox)

While some of your scars may have simply caused skin discoloration, others may have caused skin pitting, or depressions of the skin. These types of scars can be a real pain to treat, but there’s hope.  

Intense inflammation, such as that caused by acne or chicken pox, can cause a loss of collagen in the skin and result in skin pitting. There are two types of pitted scars: atrophic scars (generally shallow pits) and ice pick scars (generally deeper and narrower, looking like puncture marks), and both require treatment from a dermatologist to improve their appearance.  

For atrophic (shallowly pitted) scars, Dr. Sobanko recommends visiting your dermatologist for treatments that help smooth your skin surface and induce collagen formation: “The most successful treatments often replace collagen and smooth the contours [of your scar]. Examples of such treatments include medium depth chemical peels, dermabrasion and resurfacing lasers.”  

If you are trying to minimize the look of ice pick scars, which often appear on the face, Dr. Sobanko explains that the collagen replacement treatments listed above for shallow scars will not work. Ice pick scars require “subcision, or gentle release of the scar from its attachments to the base of the skin, with a small needle,” he explains. Goes without saying, but this is something you need to see your dermatologist to treat.    

Burn Scars

What do flatirons and cupcake pans have in common? Yes they’ll both make marvelous creations, but they can also both burn the hell out of you. But luckily, you can treat the burn mark before it comes a permanent scar.  

Once the burn wound starts to heal, Ferri recommends you start applying an antioxidant serum or lotion to the area regularly. She recommends looking for one with vitamin C to help reduce inflammation and lighten discoloration.  

Also try a dark mark corrector containing antioxidants. “This will help the skin heal in such a way that it won’t respond to the trauma by sending pigment to the cells around the wound, which is what makes a dark scar,” Ferri says.  

Another simple, extremely effective way to prevent the mark from getting darker is to use an SPF 30 sunscreen. Be religious with this. If you’re going outside—no matter how long—put sunscreen on. If you sit by a window, put sunscreen on.  

If the scar is on your face and you want to put makeup on, Ferri says that’s fine, but make sure it’s non-comedogenic and you wash it off completely before bed. You should, however, wait until your skin is not “raw” and hot from the burn before wearing makeup.  

If your burn is very painful or anything more than a slight burn, you may want to see your doctor to make sure no infection or other damage occurs to the skin in your healing process, and to get any prescribed topical treatments to promote proper healing.      


Keloid Scars
For some people, when they get a cut (or incision), it creates keloid scarring. Keloid scars are large, lumpy scars, slightly raised from the skin. While they can form on any part of the body, the chest, shoulders, upper back and earlobes are the most common spots for keloid formation.  

“Keloids are the excess growth of scar tissue at the site of a healed skin injury, ranging from minor scratches to body piercings, tattoos, burns and surgical incisions,” explains internist Dr. Andrea Ruman. “When a keloid is associated with a skin incision or injury, the keloid scar tissue continues to grow for a time after the original would has closed.”  

Dr. Ruman stresses that keloids are benign and should not be painful, so they don’t require medical treatment. But since keloids’ pronounced appearance can make some people feel uncomfortable, there are treatments that can reduce their appearance.  

Keloid treatments include “corticosteroid injections, external pressure, freezing (cryotherapy), laser treatments, radiation and surgical removal.” Surgical removal should be approached with caution as it may result in an even larger keloid scar formation. While these treatments may help for some, they can often be ineffective, explains Dr. Ruman.  

If you have a known history of keloids, you want to do everything you can to prevent their formation in the first place: Dr. Ruman recommends you avoid elective surgeries, tattoos and ear piercings.      


Treating Fresh Wounds to Minimize Scarring

Immediately after you get cut, scrapped or punctured, properly treating the wound will go a long way to help minimize future discoloration.  

As soon as you’ve been hurt, examine the wound and make sure it’s not too deep, bleeding too much or has imbedded debris. If any of these apply, visit your doctor for treatment—getting an infection like MRSA isn’t worth trying to be a hero and treating a serious wound yourself. Also keep in mind that if you were wounded by metal or an animal bite, you may need a tetanus shot.  

Next, clean the wound with cool (clean) water—warm water may accelerate bleeding—and gently wash the area with soap and a clean cloth. Avoid using hydrogen peroxide as it may hinder the healing process.  

From here, you should use an antibiotic cream or ointment to keep the wound clean and moisturized. Continue applying ointment and clean bandages to the wound for a few days. By continually applying moisturizing ointment, you help the skin repair itself and prevent the wound from drying out and forming scars.  

Do not pick at a scab once it forms. (Keep it covered if you can’t resist the urge!). Your skin forms scabs to repair itself, and when you remove it, you set back that healing process and are opening the wound to infection, which can result in further scarring.  
 
Schedule your appointment with us today by calling 831-373-2273 You can also book online at www.montereydayspa.com
Like our Facebook page HERE Follow us on Twitter HERE
Visit our website HERE
View our pins on Pinterest HERE

Article source: ChickRX